Top 10 Chair Yoga Exercises for Seniors with Chronic Low Back Pain

As a chair yoga instructor for older adults, one of the top problems seniors come to me with is chronic low back pain. That's why I've dedicated the whole month of August 2024 to this issue specifically.
We started the month with a deep dive into the most common physical and mental culprits behind chronic low back pain in older adults. We identified specific parts of the body where seniors should focus on building strength, flexibility, and mobility. However, we left off without discussing specific chair yoga poses you can do for lower back pain.
In this blog post, we'll outline:
The best chair yoga exercises for seniors to improve strength in their core and hips
Effective poses to help stretch muscles in the front, back, and sides of the legs
How to do each of the seated exercises to ensure maximum benefit and safety
At the end, we'll also provide you with a FREE chair yoga for lower back pain pdf. This is a printable 28-day chair yoga challenge for older adults with detailed pictures and instructions guiding you through a seniors yoga program for chronic low back pain. Ready to get started?
Best chair yoga poses for low back pain
#1 Seated cat-cow

The first of our chair yoga exercises for seniors with chronic low back pain is our seated cat-cow stretch.
To practice this exercise, come into a comfortable seated position with your feet planted firmly on the ground, and your hands resting on the tops of your knees. As you inhale, lift your chin upward, use your hands to pull your chest forward, and gently arch through the upper back. This is your seated cow pose. As you exhale, press your knees away, curl your chin inwards, and engage through your core, as if you were doing a crunch. This is your seat cat pose.
Continue with the movements for 3-5 rounds; lean forward on the inhale, and press back on the exhale.
Cat-cow pose is a regular exercise seniors with low back pain should incorporate in their chair yoga routine. It is excellent at lubricating the joints in your spine and helps build postural awareness of your pelvic tilt.
This pose is safe for most seniors apart from a few exceptions. If you have had a recent spinal surgery or injury, it is best to seek advice from your doctor prior to practicing chair yoga. Additionally, if you have osteopenia or osteoporosis it is best to move through seated cat-cow pose with more slow, movements and deep breaths.
#2 Seated hip circles

Our next chair yoga pose for low back pain is hip circles. These are exactly what they sound like and are extremely easy to do.
Simply sit in your chair slightly off to the right side, and wrap your fingers around the bottom of the chair for support. Use the muscles in your hip to raise your foot off the floor, and rotate through the hip drawing circles with the right knee. Try to make these circles as wide, slow, and controlled as possible. Move through 3-5 hip rotations before reversing the direction of the circles.
Once you've completed your hip circles on the right, you can repeat the same sequence on the second side.
Hip circles are a simple, yet effective exercise to see improved strength and mobility through the hips. Increasing the range of motion in your hip joints will improve your posture, when performing movements, such as bending to pick something up or moving from sitting to standing, that can strain the lower back if done incorrectly.
Most senior citizens can do hip circles without cause for concern. However, speak with your doctor if you have been diagnosed with osteoporosis/osteopenia or if you have had a recent hip replacement surgery prior to trying this exercise.
#3 Seated fire hydrants

In addition to improving hip mobility, hip strength is also an essential ingredient for reducing the risk of lower back pain as you age. One simple exercise you can do to build hip strength is called fire hydrants. Why? Because you look similar to a dog marking its territory on a fire hydrant!
To practice, pivot 45 degrees to the left in your chair. Your left leg should be in front of you, and your right leg will be off toward the side with the knee bent. Hold onto the back of the chair with your left hand, and hold onto the bottom of the chair with your right hand for stability. Inhale, look straight ahead, and exhale, raise your knee up as much as you can. Try to keep your lifted leg bent at 90 degrees.
Inhale as you release the leg back down to the floor. Repeat this movement 3-5 times before repeating it on the other side. If you experience cramps in your hip, don't worry. This is very common. Simply take a pause, straighten your leg out in front of you, and return to the movement when the cramp has subsided.
Isolated hip exercises like this will help build an equal amount of strength on both sides of the body. This, in turn, prevents lateral misalignment of the hips which is a significant risk factor for herniated discs and sciatica.
As was the case with hip circles, speak with your healthcare provider about whether or not this practice is safe for you if you suffer from osteoporosis or have had recent hip surgery.
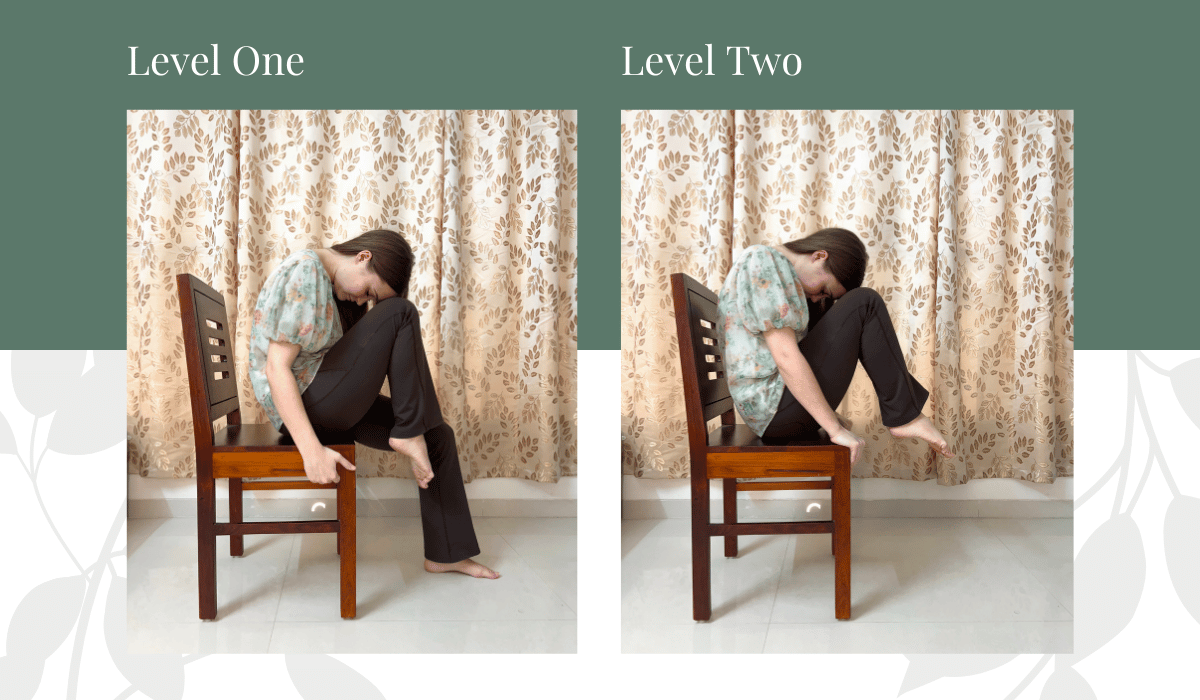
#4 Seated forward fold

The seated forward fold, also known as janu sirsasana in Sanskrit, is a highly effective chair yoga pose for improving flexibility in your hamstrings, the muscles in the back of your legs. Tight hamstrings can lead to poor posture and increase pressure in the lower back, which is why it's so important to stretch them daily.
To practice janu sirsasana, chair yoga variation, start by coming into a comfortable seated position. Extend one leg straight out in front of you and keep the other knee bent. Curl your fingers underneath the chair for support. Inhale, extend your spine long. Exhale, keep your chest lifted and your gaze fixed on a point ahead of you as you start the lean bend over the extended leg.
Continue to lean forward until you reach about 80% of your max range of motion, and hold for 5 breaths. On each inhale, continue to lift through the spine. On each exhale, see if you can sink a little bit deeper into the pose. Once you've completed the first side, inhale, and come back up to your original position. Repeat the same process on the second side.
Unlike the chair yoga exercises we've discussed thus far, forward folds come with a few contraindications that require modifications.
First, if you have high blood pressure or a heart condition, you should never attempt yoga poses in which your head moves below your heart. To modify this pose, you can hook a strap around the bottom of your foot, and try to lift it up while keeping the leg straight.
This modification may also be appropriate for those with spinal issues, such as herniated discs, lumbar spinal stenosis, degenerative disc disease, or severe osteoporosis. Forward bending can put a lot of pressure on the vertebrae and discs in the lumbar spine if surrounding muscles in the lower back are not strong enough to support the movement.
#5 Chair warrior 1

Stiffness in the quadriceps and hip flexors, which run along the front of the legs, can lead to similar postural issues as tightness in the hamstrings. It is, therefore, essential that chair yoga for seniors with low back pain incorporate stretches for these muscles. Lunges are a great way to increase flexibility in the quads and hip flexors, however, they are not accessible to many senior citizens.
To modify, start by coming into a seated position. Pivot your left leg over toward the left side of the chair, turn your shoulders and hips to face the left, and plant your left foot firmly on the ground. Extend your right leg out long behind you, and press down through the ball of your right foot. As you stay in this position, engage through your core, and scoop the tailbone forward to increase the sensation through the front of your back leg.
Hold the pose for 5 deep breaths before repeating on the other side.
Approaching high lunge, also called warrior I, with the chair makes this pose safe and accessible for those who might otherwise have contraindications. However, if you are currently in recovery from an acute spinal injury or surgery, it is best to consult your healthcare provider prior to practicing.
Taller individuals and/or yogis with long legs might also find this pose awkward if their chair is too low. If this is the case for you, try using a chair with a higher seat if available, or stack two yoga blocks on the seat to bring it up to your body.
#6 Cross-legged side stretch

Apart from weak hip muscles, uneven tightness in the TFL and IT band can contribute to lateral misalignment of the hips and lower back pain in senior citizens. This next chair yoga pose stretches and releases the outside of the legs and hips. It is a cross-legged side stretch and is performed standing up, using the support of the chair for balance.
To practice, start by standing perpendicular to the backside of the chair. Reach your left hand out to hold onto the chair. Cross your right ankle in front of your left, and set the outer edge of your right foot down on the floor. Extend and raise your right arm up and overhead toward the left side. As you do so, shift the weight of your hips toward the right.
You should feel the benefits of the stretch extend from the ankle all the way up the side of the calf, thigh, hip, obliques, and right arm. Hold the pose for 5 deep breaths. Once you've completed the first side, repeat the same movement on the other side.
This is a more advanced chair yoga pose and may not be accessible for certain seniors. If you have significant challenges with balance, problems with or recent surgeries in the knee, hip or shoulder, or a history of vertigo, it is best to avoid this pose unless cleared by a medical professional.
Yoga isn't just for the body. It's for the mind as well. It's important to learn how to recognize when a pose does more harm than good and have compassion for your limitations.
#7 Boat pose
Core strength is essential to support proper posture and protect the spine. Even though core work is no one's favorite thing, it truly is a necessary evil. In order to help build more core strength, we will practice a chair yoga variation of the traditional boat pose, or navasana in Sanskrit.
To practice this pose, start by sitting in a comfortable position. Wrap your fingers around the front of your seat, and curl your forehead and tailbone in like you did in cat pose. Squeeze through your abs as you raise one knee up and try to touch it to your forehead. Keep your core muscles engaged the whole time, holding the pose for a count of 5. Repeat the exercise again on the left.
If this feels too easy for you, you can try lifting both knees up at the same time.
This chair yoga pose is generally safe for most seniors, apart from those who are currently suffering from a hernia or recovering from abdominal surgery. However, it is important to immediately come out of the pose if you experience any pressure in the lower back. If you feel tension here, it is an immediate red flag that your core is no longer active, putting you at risk of injury.
#8 Revolved heat-to-knee pose

Parivritta janu sirsasana, or revolved head-to-knee pose is an excellent stretch from the QL muscles on either side of the lower back.
However, the traditional pose requires a decent amount of hip mobility and the ability to comfortably move to sit on the floor. When adapting yoga for seniors of all fitness levels, this is often not accessible. Here's how you can practice a senior-friendly chair yoga variation of revolved head-to-knee pose that provides all of the same benefits.
First come to sit, with the knees out wide in a straddle position. Reach across your body to grab the outside of your left thigh with your right hand. Then, as if you were doing a free stroke, bring your left arm up and overhead as you reach down and to the right side. Think about curling your chin and tailbone in towards center as you do so.
Hold this pose for a total of 5 breaths. Slowly, come out of the pose on an inhale and repeat the exercise on the second side.
Back pain originating from sciatica is often at least partially caused by uneven tightness of the QL on one side of the low back. While revolved head-to-knee pose helps address this issue, it can be more challenging for those who need it most.
If you have sciatica or other nerve-related pain originating in the low back, be sure to approach this pose slowly and gently, and stop if you feel pain. Over time, the pose will begin to feel more accessible and pleasant.
#9 Eagle twists

As an honorable mention, twisting exercises can help improve the overall health of the spine. While twists should occur primarily in the thoracic spine, shoulders, and neck, they still play a role in managing chronic low back pain. Namely, twists improve the spinal mobility and lubrication of vertebral discs, they release tension in and around the lower back, and they can strengthen muscles that support the spine.
However, deep twists can do more harm than good for those with diagnosed osteoporosis, nerve-related spinal problems, and/or recent abdominal surgery. In these cases, it is best to avoid twists altogether or to approach them gently under the supervision of an experienced chair yoga teacher or medical professional.
If you'd like to give twists a try, here's how you can do a chair yoga variation of eagle pose, or garudasana.
Start by sitting down comfortably. Stack your left knee over the top of your right, and extend your arms straight out in front of you. Bend your elbows slightly, and press your forearms together for modified eagle arms.
Inhale, extend through the spine. Exhale, use your core to actively twist to the left. Hold the twist for five slow, gentle breaths. Release the twist on the exhale, return to center, and take the twist in the other direction.
This pose should provide an immediate feeling of well-being in your spine.
#10 Savasana

The final and most important pose in any yoga class is always savasana. Traditionally, savasana is performed by simply lying down on your back with your palms up toward the sky. Feel free to take this option if it works for you.
However, getting down to the floor and/or lying on one's back is not always accessible or comfortable for senior yogis. If you can make it to the floor but have discomfort laying on your back, try putting one pillow beneath your head and another beneath your knees.
If getting up and down is more trouble than it's worth, you can also take savasana sitting in a chair or on your couch. Just be sure to utilize pillows and/or ergonomic supports so that you can be completely relaxed and comfortable to sit for 3-5 minutes.
The "goal" of savasana is to have no goal. To be completely effortless in body and mind. To allow yourself to just be and receive the benefits of your practice. Take whatever option works for you, and allow yourself to rest in the pose for as long as you desire.
Grab your FREE printable chair yoga for seniors pdf

Ready to roll out your mat, grab your chair, and practice this chair yoga sequence for lower back pain? Well, I have good news for you!
I decided to create a printable senior chair yoga pdf with these top 10 chair yoga moves for senior citizens with chronic low back pain. In this chair yoga guide, you'll find clear pictures and step-by-step instructions on how to do the poses.
On top of that, I've created a 28-day yoga for seniors challenge that will help make chair yoga a part of your daily routine. The goal is to reach a total of 21 days, without skipping practice for more than one day in a row.
Ready to get started? Click the button below to get your FREE printable yoga for seniors pdf!
Let's stay in touch!
As always, I hope you got something truly useful out of this article. It's my mission to make yoga for seniors more accessible, engaging, and effective.
Beyond the information and free yoga resources I share online, I am always eager to connect individually with the people who connect with my work. Please don't hesitate to reach out directly if you have additional questions about anything I've shared or would like more insight into your unique situation. You can reach me directly at info@haidensyogapractice.com.
Visit my website to learn more about my paid yoga and mindfulness services for senior citizens, or book a FREE consult call to learn more about how we can work together to achieve your goals:
Book a Consult: calendly.com/haidensyoga/30min
1:1 Chair Yoga for Seniors: haidensyogapractice.com/private-chair-yoga-classes-for-seniors
Group Chair Yoga for Seniors: haidensyogapractice.com/group-chair-yoga-for-seniors
Private Meditation Sessions for Seniors: haidensyogapractice.com/mindfulness-for-seniors
Thank you for taking the time to read this blog post. I wish you a wonderful rest of your day, filled with mindfulness and ease.